
1. Cookies
Perfect for making uniform cookies, whether soft or crunchy. Ideal for butter cookies, vanilla, cocoa, or spiced shortbread.
2. Potato Gnocchi
A die designed to create gnocchi that are compact yet soft. Excellent with butter and sage or a rich meat ragù.
3. Udon / Pici
Versatile for Japanese udon (thick and elastic) or Tuscan pici (rustic and hearty). Perfect in broths or with sugo all’aglione.
4. Cannelloni
Creates perfectly shaped cannelloni ready to be filled with ricotta and spinach, ragù, or seafood. Ideal for oven-baked dishes.
5. Giant Conchiglioni
A die for large, fillable conchiglioni. Perfect with ricotta and sausage, pumpkin and taleggio, or meat ragù.
6. Tagliatelle
The classic 6–8 mm tagliatelle die. Excellent with ragù, mushrooms, truffle, or cream and ham.
7. Fusilli
Creates well-formed, tightly curled fusilli. Ideal with pesto, fresh tomato sauce, zucchini cream, or sausage ragù.
8. Grissini (Breadsticks)
For crunchy breadsticks, thin or thicker. Great plain or flavored (sesame, rosemary, onion, paprika).
9. Orecchiette
Perfect for the typical concave Pugliese shape. Ideal with broccoli rabe, fresh tomato sauce, or ragù.
10. Lasagne
Produces wide, even sheets for classic lasagne alla bolognese or white versions (mushrooms, pesto, vegetables).
1️⃣ Risone – The perfect die for making alternative “rice-style” pasta salads: fresh, colorful, and endlessly customizable.
2️⃣ Fusilli (all sizes) – Ideal with seasonal vegetables or as a base for delicious cold pasta dishes. A true Italian summer must-have.
3️⃣ Farfalle – A light, playful, and fun shape, perfect for fresh and creative dishes loved by both adults and kids.
4️⃣ Busiata – A Mediterranean classic, pairs wonderfully with pesto, seafood, cherry tomatoes, and summer herbs.
5️⃣ Chitarra – Excellent for seafood-based first courses: clams, mussels, or crustaceans. Holds sauces beautifully and cooks to perfection.
6️⃣ Margherita – A summer flower on your plate: scenic, creative, and ideal for surprising your guests with a unique yet versatile shape.
7️⃣ Grissini – Crunchy and irresistible, perfect on their own or served with cold cuts, dips, or cheeses for a summer appetizer.
8️⃣ Udon/Pici – A trendy format that brings a touch of oriental cuisine to Italian tradition. Great for fusion dishes, veggies, or chilled broths.
9️⃣ Casarecce – Rustic and embracing, perfect for sauces with eggplants, cherry tomatoes, basil, and salted ricotta.
🔟 Maccherone – The most traditional format, ideal for light baked pasta dishes or simple meals with fresh tomato and basil.
Hydration is the total amount of liquid present in a dough in relation to the amount of flour used. Liquids can include water, oil, eggs, purees, etc.
In homemade pasta, the amount of water is usually calculated on 500 or 600 grams of flour, since home machines have a smaller capacity. However, recipes often indicate hydration as a percentage rather than in exact quantities. So how do you know how much liquid to add?
✅ How to calculate the amount of liquid needed: if you have the flour and want to know how much liquid to add:
Flour × Percentage = Hydration
Example: You have 500 g of flour and want a 38% hydration. 👉 500 × 0.38 = 190 g total liquid (water + eggs + oil + other)
For example:
✅ How to calculate the hydration percentage of a recipe: if you already have flour and liquids and want to know the hydration level:
(Total Liquids ÷ Flour) × 100 = Hydration Percentage
Note: in cooking, grams and milliliters for liquids are often treated as equivalent.
Factors that influence hydration
💧 Recommended Hydration Levels
| Pasta Type | Recommended Hydration % |
|---|---|
| Short pasta | 36–40% |
| Long pasta | 36–40% |
| Sheets (lasagna, etc) | 38–45% |
| Spiral-shaped dies | 35–38% |
| Shaped dies | 40–44% |
🛠️ How to Adjust the Dough
Final Note
If the pasta isn’t smooth during extrusion, the machine or die might not be warm enough. In that case:
Hydration Values Table
| Flour (g) | Hydration % | Liquid to Add (g) |
| 250 | 25% | 62.5 |
| 250 | 26% | 65 |
| 250 | 27% | 67.5 |
| 250 | 28% | 70 |
| 250 | 29% | 72.5 |
| 250 | 30% | 75 |
| 250 | 31% | 77.5 |
| 250 | 32% | 80 |
| 250 | 33% | 82.5 |
| 250 | 34% | 85 |
| 250 | 35% | 87.5 |
| 250 | 36% | 90 |
| 250 | 37% | 92.5 |
| 250 | 38% | 95 |
| 250 | 39% | 97.5 |
| 250 | 40% | 100 |
| 250 | 41% | 102.5 |
| 250 | 42% | 105 |
| 250 | 43% | 107.5 |
| 250 | 44% | 110 |
| 250 | 45% | 112.5 |
| 250 | 46% | 115 |
| 250 | 47% | 117.5 |
| 250 | 48% | 120 |
| 250 | 49% | 122.5 |
| 250 | 50% | 125 |
| 500 | 25% | 125 |
| 500 | 26% | 130 |
| 500 | 27% | 135 |
| 500 | 28% | 140 |
| 500 | 29% | 145 |
| 500 | 30% | 150 |
| 500 | 31% | 155 |
| 500 | 32% | 160 |
| 500 | 33% | 165 |
| 500 | 34% | 170 |
| 500 | 35% | 175 |
| 500 | 36% | 180 |
| 500 | 37% | 185 |
| 500 | 38% | 190 |
| 500 | 39% | 195 |
| 500 | 40% | 200 |
| 500 | 41% | 205 |
| 500 | 42% | 210 |
| 500 | 43% | 215 |
| 500 | 44% | 220 |
| 500 | 45% | 225 |
| 500 | 46% | 230 |
| 500 | 47% | 235 |
| 500 | 48% | 240 |
| 500 | 49% | 245 |
| 500 | 50% | 250 |
Article written with the contribution of Elise Avella Feiner.
Cooking pasta is a true art form, one that has its roots in the kitchens of Italian grandmothers. With expert hands and lots of love, they’ve always brought homemade delicacies to the table — a genuine expression of traditional home cooking. The idea of homemade pasta comes from them: a culinary tradition passed down through generations, which still today fully embodies the spirit of Italian cuisine.
At Pastidea, we’ve always nurtured a deep passion for fresh, homemade pasta. Our company was born from this passion, thanks to the vision of our founder, Maurizio Prazza.
From a love for pasta and a desire to experiment came the idea of extruding pasta into countless shapes — to enhance every dough, every recipe, and every occasion in a unique and creative way.
But among all the steps, cooking pasta is perhaps the most delicate. Each shape has its own cooking time and needs specific care. It only takes a small mistake to compromise the final result — or to elevate it to perfection. The right cooking makes the difference between a good plate of pasta and an unforgettable experience.
Cooking times for pasta mainly depend on the size and especially the thickness of the shape. On average, they range from as little as 3 minutes to about 10 minutes for common sizes. For thicker pasta (over 1.5 mm), cooking time can reach up to 20 minutes. For pasta with a thickness between 0.8 mm and 1.2 mm, the average cooking time is around 6–7 minutes.

Another key factor is the dough composition: if it contains eggs, the pasta tends to cook more quickly. On the other hand, dried pasta takes longer to cook.
During preparation, it's important to boil the pasta in plenty of water to prevent it from sticking. To help the pasta separate during cooking, you can add a small amount of oil — even just one tablespoon — to the water.
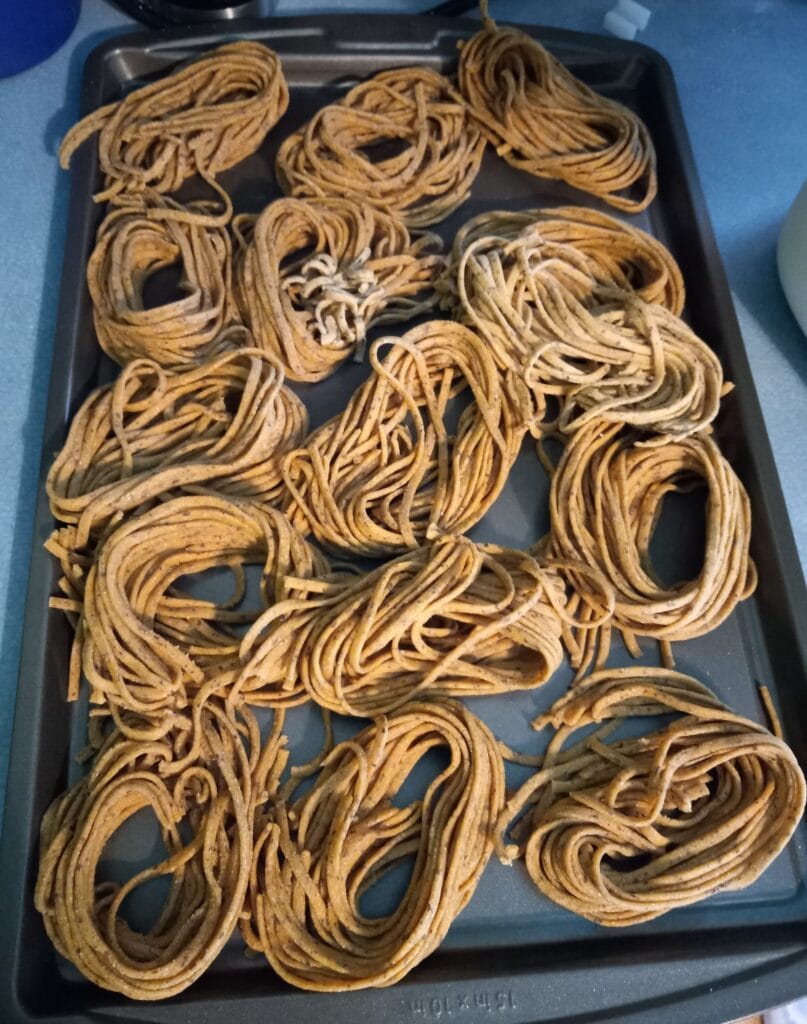
For long pasta, it helps to form small “nests” before placing it in the water — this ensures even cooking. In this case, add a teaspoon of oil to the water to keep the nests from sticking together, and gently stir with a fork (without breaking the pasta) to help them separate. In general, pasta should be stirred occasionally with a wooden spoon, avoiding metal utensils.
When cooking filled pasta like ravioli, bring the water to a boil and then lower the heat slightly. A vigorous boil could break the delicate dough and cause the filling to leak out.
A useful trick for gnocchi is to wait until they float to the surface — this usually takes 2–3 minutes. Once they rise, taste one to check doneness. Be careful not to overcook them, or they may fall apart.
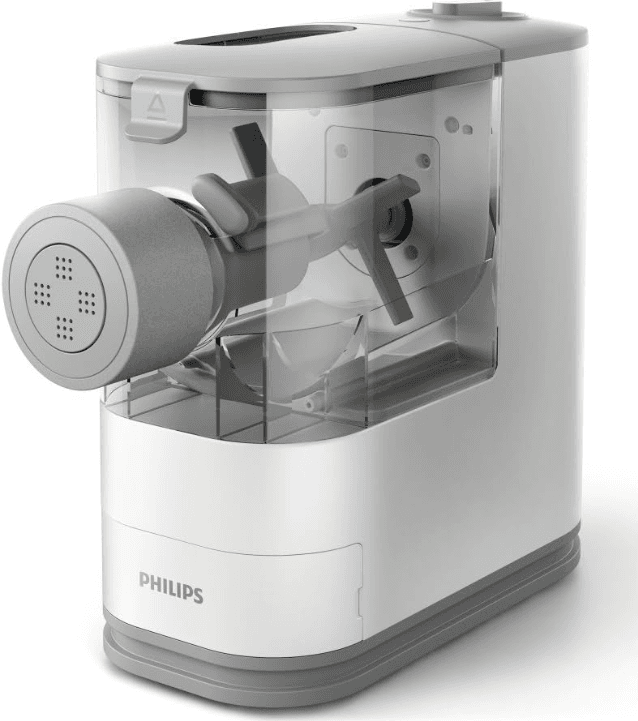
Want larger quantities and more shape variety? The 7000 is the best choice.
Looking for a more compact model with a refined design and medium capacity? The 5000 is ideal.
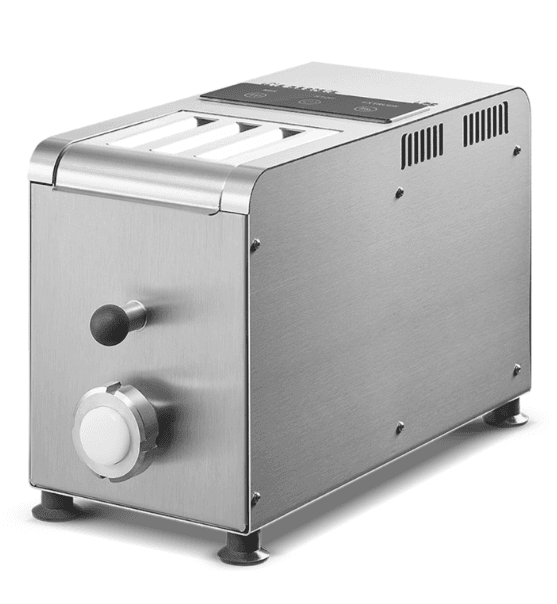
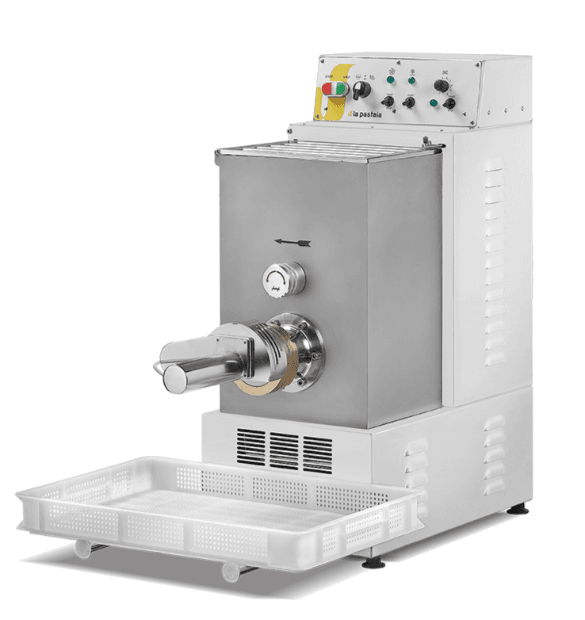
The TR50 model is a compact yet powerful solution, capable of handling up to 1.8 kg per cycle and 5 kg per hour. It can mix any type of flour with water or eggs and can also produce pasta sheets. It features stainless steel components and is easy to clean, making it perfect for small restaurants or semi-professional use. The LP5 TR50CH version includes a touch control panel and is available in both European and American versions — ideal for small facilities and home kitchens.
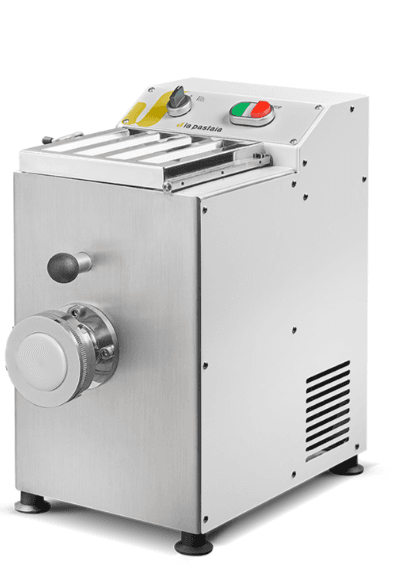
If you need higher capacity, the TR70 processes up to 2.5 kg per cycle and 8 kg per hour. It offers the same features as the TR50, but with greater productivity, suitable for small artisanal productions.
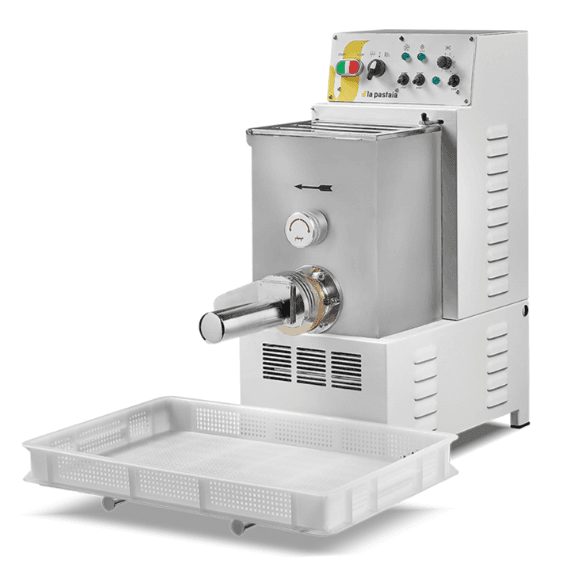
For even more intensive production, the TR75 features a cooling system, an electronic cutter for automatic pasta cutting, a drying fan, and can produce up to 5 kg per cycle and 12 kg per hour. Built with food-grade certified materials, it's available in both single-phase and three-phase versions and is perfect for users who need high performance.
The TR95, the top-of-the-line model, can handle up to 9 kg per cycle and has a maximum production rate of 23 kg per hour. It also includes a cooling system, electronic cutter, drying fan, professional-grade materials, bi-directional rotation, and quick disassembly. This machine is ideal for pasta shops, catering businesses, or kitchens with high-volume demands.
Lastly, if you’re looking for a compact but professional machine, the Fattorina Fimar MPF 1.5 features a 1.5 kg bowl and a production rate of about 3 kg/h. It’s sturdy, easy to clean, and compatible with 4.5 cm bronze dies. If you need slightly more capacity, the Fattorina VIP2 (MPF 2.5) offers a 2.5 kg bowl and a 5 kg/h output, perfect for abundant home production or small laboratories.
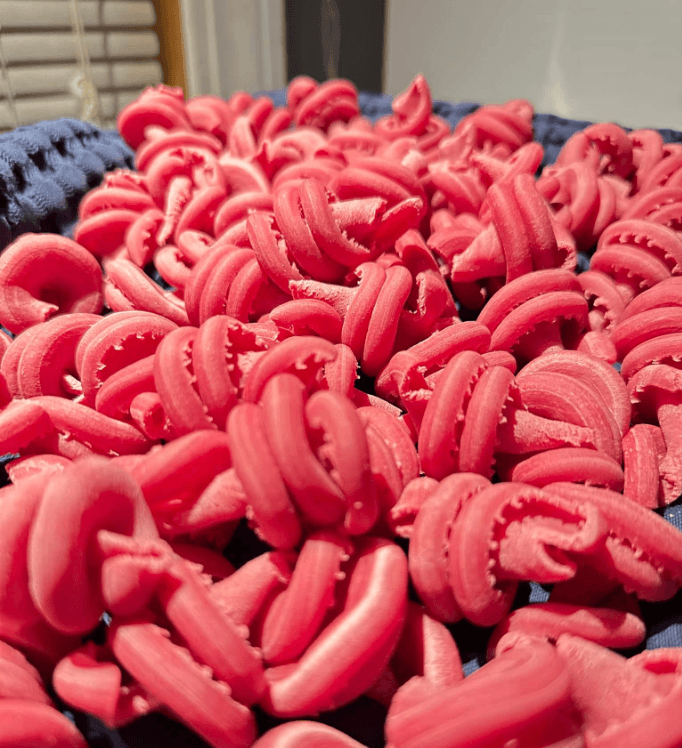
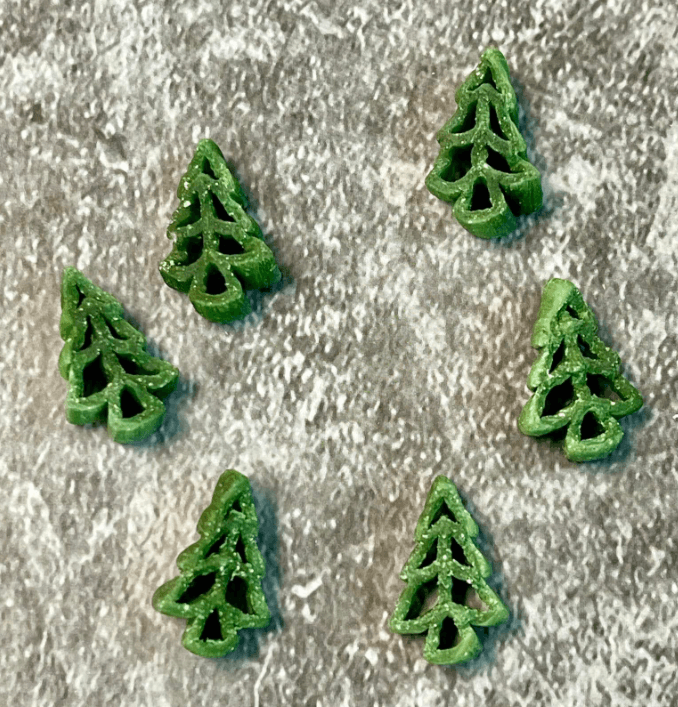
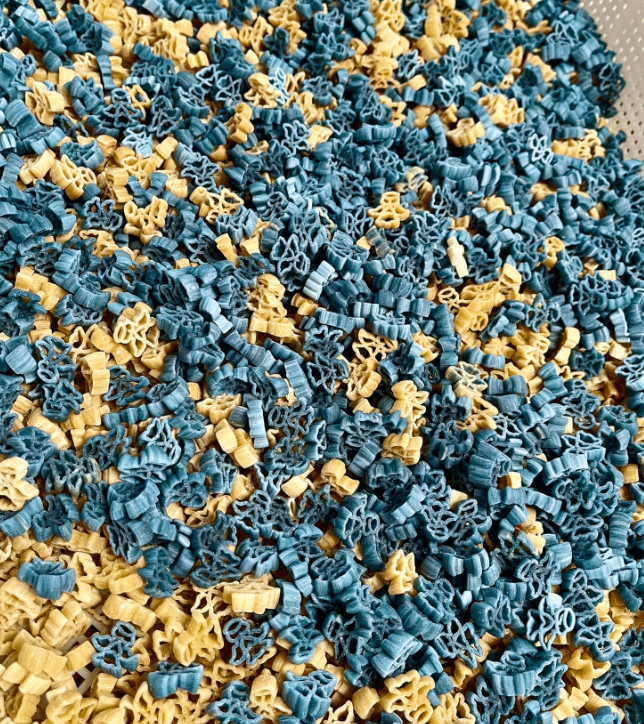
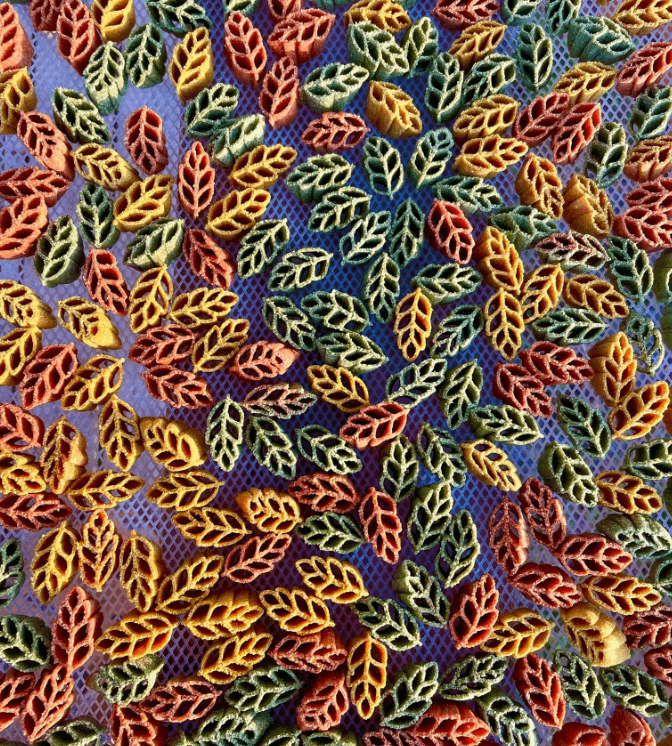
The dough for the Philips Pasta Maker can be colored and flavored before extrusion by simply adding plant-based powders. This way, you'll get vibrant, flavorful pasta – perfect for creating unique, authentic, and natural dishes.
The recommended starting dose is 1–3 grams of powder for every 100 grams of flour. The amount can be adjusted based on the desired color intensity and flavor, as some powders have a stronger taste. It's always best to experiment. Powders can be added directly to the flour or dissolved in the liquid ingredients, such as water or eggs. They mix easily with eggs. If using water, it’s better to add it gradually to avoid lumps. Be careful with highly pigmented powders like turmeric or squid ink powder: in these cases, it’s advisable to start with about 1 gram per 100 grams of flour and evaluate the effect before adding more..
If you make large quantities of pasta, whether to give as gifts or to store, there are various methods depending on the type of dough.
once the pasta is made, especially in large batches, you can let it dry:
🔹 On a clean white cloth
🔹 On pasta drying racks or drying boards
Even if it seems dry after a few hours, for safe and long-term storage, 3–5 days of complete drying are often needed, especially in humid or cool conditions.
– Egg-free pasta is well suited for drying and can be stored in bags or airtight containers at room temperature.
– For egg pasta, drying for a few days is fine, but for longer storage (beyond two weeks), it’s better to freeze it to ensure safety and quality.
is an excellent way to preserve pasta, especially egg pasta or delicate shapes.
Here’s how:
For long pasta, create small nests, dust them lightly with flour, and freeze the same way.
Avoid stacking heavy items on top of frozen pasta to prevent breakage.
REFRIGERATION
• Fresh pasta can be stored in the fridge for about 5–7 days.
• In the freezer, it keeps well for about a month, though often lasts longer.
• Filled pasta (like ravioli or tortellini) should be frozen in a single layer on a tray, then transferred to containers or bags once firm.
Dies with special shapes – such as animals, cars, flowers, or complex formats like fusilli and cellentani – require dough with a very precise level of hydration. This is because these dies contain delicate elements, some of which are very thin. If the dough is too hard or dry, it creates excessive pressure inside the machine during extrusion. This pressure can damage or even break the die. For this reason, it is essential to follow the correct hydration instructions to ensure proper extrusion and preserve the integrity of the die.
Breakage or issues with shaped dies are almost always caused by incorrect usage. The most common reasons include:
- An unbalanced dough, often caused by the recipes provided by the Pasta Maker itself, which automatically weighs the ingredients but often results in underhydrated dough
- A dough that hasn’t rested, as the Philips machine starts extrusion just 3 minutes after mixing, with no settling time
These factors can compromise the extrusion process and, over time, damage the die, especially for more complex shapes.
The standard Philips Pasta Maker process (add ingredients, knead, and immediately extrude) is not ideal for fine dies.
We recommend the following procedure:
1. Mix the ingredients and knead for 2 minutes
2. Pause the machine for 30 minutes to let the dough rest,
3. then knead for 1 more minute and extrude.
This optimized method ensures a uniform dough, prevents clumping, and avoids clogging or excess pressure in the finer openings.
Letting the dough rest allows:
- 250g of re-milled semolina
- 100ml of water (minimum 40% hydration). Knead for 6 minutes, let rest for 30 minutes, knead again, and extrude.
Cleaning the dies is often one of the most challenging steps in preparing fresh pasta with the Philips Pasta Maker. Bronze and POM (polyoxymethylene) dies, in particular, can be difficult to clean—especially those with numerous small holes or particularly thin sections.
To address this issue, Pastidea provides practical guidance and useful tips to simplify maintenance, prevent damage, and ensure the long-lasting performance of your dies.
Pasta can be made with various types of flour: type 00 flour, all-purpose flour, semolina, durum wheat flour, almond flour, rice flour, etc. Each type of flour has a different water absorption capacity. “Stronger” flours, like semolina or type 00, may require up to 10 g (or ml) more liquid compared to others. Even flours of the same type but from different brands can behave differently. Additionally, room temperature and humidity also influence how much liquid is needed.
➜ For extruded pasta, re-milled semolina is recommended.
Type 00 flour alone is not suitable for extrusion: it tends to form a weak structure and is not recommended for regular pasta shapes. It may appear in some traditional recipes and can sometimes be added in small amounts, but this should be done carefully.
The terms semolina and semola are often confused or used interchangeably, but they refer to different products:
📌 Note: In many English translations, “semola rimacinata di grano duro” is often labeled simply as “semolina.” However, this is not entirely accurate. In Italy, “semola” typically refers to a finer, more refined flour ideal for both fresh and extruded pasta.
Alternative and whole grain flours
Gluten-free flours cannot hold together well on their own, especially in extruded pasta.
Always add a binder like xanthan gum to improve elasticity and dough cohesion.
Just small quantities (e.g., 2–3 g per 250 g of flour) can significantly improve dough stability.
Re-milled durum wheat semolina
Highly recommended for extrusion due to its fine grain and excellent handling:
Type 00 and Type 0 Flours
Not ideal alone for extrusion, but usable in small portions in egg doughs or softer mixes:
Whole and Spelt Flours
Perfect for a rustic or high-fiber touch. Often mixed with semolina to ensure smooth extrusion:
Specialty and Gluten-Free Flours
Require more attention. Use binders like xanthan gum for elasticity and structure:
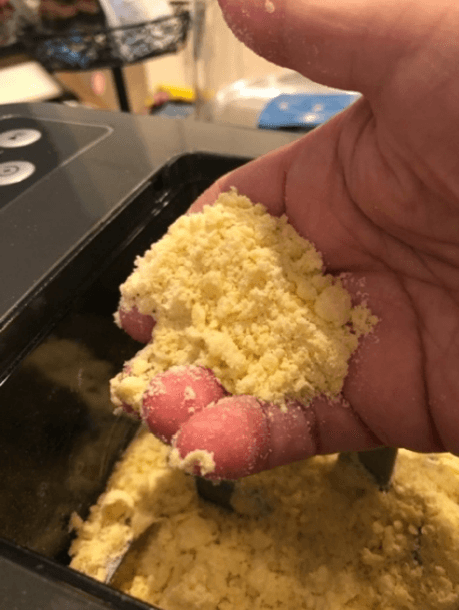
If you're used to making pasta by hand or with a manual machine, working with extruded dough may feel like a completely different experience. Unlike traditional dough, extruded dough requires a grainy texture. This isn’t a mistake – it’s the ideal condition for achieving good results with pasta dies.
The correct consistency should resemble coarse sand. When squeezed in the palm of your hand, the dough should compact easily; when rubbed between the fingers, it should crumble again.
A good method is to mix the dough, pause the machine just before extrusion (depending on the model), and turn it off. After a short rest, restart and mix again. In some cases, letting the dough rest for 20–30 minutes helps the flour absorb moisture more effectively.
For this reason, it’s best not to add extra liquid until the final mixing phase is complete. If the dough seems very dry, simply letting it rest is often enough to improve hydration naturally. Conversely, dough with high hydration can become too soft and difficult to extrude if left to rest too long.
As a general rule, with proper hydration, it’s advisable to mix twice before starting extrusion.
If extrusion is difficult, the cause is often incorrect hydration. In these cases, it can help to remove the die, break up the accumulated dough, put it back into the machine, clean the die, and start over.
Sometimes, after turning off the machine, you might have trouble restarting it. Here's what to do:
The machine is also programmed to reverse periodically during extrusion – this creates what we call a “dough coil.” Break it up with your fingers, put it back into the machine, and let it extrude again.
If you need the machine to extrude for longer, switch to extrusion-only mode: turn off the machine, reset it, and press only the “Extrude” button. Repeat as needed until all the dough is extruded.
When making long pasta, keep one hand under the pasta to guide it – this really helps.
Eggs are used to make pasta that will be rolled into thin sheets, such as:
Most pasta served in broth is made with egg-based dough, except for a few cases like riso or risone. Eggs give the dough structure and richness, making it more elastic and less soft.
Semolina and water are ideal especially for extruded pasta, for example:
You can use lukewarm water (around 36°C–40°C), but room temperature water is recommended. Adding eggs to these shapes may alter the flavor and make the pasta rubbery.
Article written with the contribution of Elise Avella Feiner.
In recent times, there has been much discussion about the use of the terms "bronze die" and "bronze extrusion", especially in the world of home pasta-making accessories. Some manufacturers question these terms, claiming they are technically imprecise or even misleading.
At Pastidea, we believe it is important to provide accurate and complete information — without oversimplification — and with the utmost respect for those who, every day, choose to make fresh pasta at home, with passion and awareness.
We use the term “bronze die” in our product titles because it has become widely accepted to describe a type of extrusion that produces rough, porous pasta — just like traditional artisanal methods. However, we always accompany this with a clear explanation of the actual material used: a copper-based metal alloy, commonly known as brass, compliant with food contact regulations.
Not all brass alloys are suitable for food use. That’s why we carefully selected ours after a thorough evaluation with our suppliers, ensuring we use a safe, certified material that meets all legal standards.
Home-use pasta dies are not made of pure bronze, but of a technical alloy composed mainly of copper, with the addition of zinc and other elements. This alloy was chosen for its specific qualities:
In common language, the term “bronze die” does not refer to the exact composition of the material, but rather to the type of extrusion process that gives the pasta a rough surface, ideal for holding sauces. It’s a term widely used by both professionals and enthusiasts, and has long been associated with a high-quality, traditional method of pasta making.
Some competitors offer hybrid pasta dies, made with a food-grade plastic (POM) body and a non-removable metal insert. While this may seem like a reasonable compromise, in practice it has more drawbacks than advantages:
Hard to clean: Since the insert cannot be removed, it’s difficult to thoroughly clean the inside. Pasta residue can build up in hard-to-reach areas, leading to hygiene issues.
Not dishwasher safe: Although the main body is plastic, the fixed metal part means the entire die must be washed by hand — negating one of the main benefits of POM.
More expensive if you want multiple shapes: Each hybrid die includes only one shape. To make different pasta types, the user has to purchase multiple dies, increasing both cost and storage needs.
In short, this is a poorly thought-out solution that combines the disadvantages of metal (not dishwasher safe) and plastic (low thermal conductivity), without offering real benefits to the end user.
In contrast, our solid brass dies, especially when combined with a metal adapter, ensure even heat conductivity across the entire structure, improving extrusion and delivering professional-level results even at home.
If your priority is affordability and flexibility, we recommend our patented modular system with interchangeable inserts and reusable die holders. The inserts can be fully disassembled, are easy to clean, and allow you to purchase only the formats you need — saving you money if you want to experiment with different shapes.
Lastly, for those who want a single, practical format, we offer dies made entirely of POM (food-grade plastic). These are dishwasher safe, easy to use, and deliver faster extrusion with smoother pasta.
In our view, combining two opposite materials in a fixed, non-removable way does not produce a technically sound solution for any specific use case. That’s why we’ve chosen not to produce plastic dies with fixed brass inserts, and instead offer three distinct options — each with a clear and consistent purpose.
In recent years, low-cost dies have appeared on Amazon, often molded and sold at very attractive prices.
At Pastidea, we feel it’s important to warn consumers: in many cases, these dies are made from materials that are not certified for food contact, and it is impossible to verify their origin or compliance with European safety standards.
Honestly, we would not trust preparing pasta with dies made from questionable raw materials.
Our dies, while slightly more expensive, are:
This level of care and attention to quality is evident in every die we offer.
At Pastidea, we design every die with a consistent and functional approach — no hybrid shortcuts or gimmicks. We offer three clear alternatives, each suited to different needs:
1. Full POM dies (food-grade plastic)
Ideal for daily use: lightweight, dishwasher safe, fast extrusion, and perfect for smooth pasta.
2. Full brass dies (copper-based food-safe alloy)
The best choice for those seeking a professional finish and rough, sauce-holding texture. Brass offers excellent thermal conductivity, especially when paired with a full-metal adapter.
3. Patented modular system with interchangeable inserts
A compact, hygienic, and cost-effective solution for anyone who wants multiple pasta shapes. Disassemblable and easy to clean, it grows with your creativity.
In a market where shortcuts and vague marketing are common, Pastidea chooses coherence, certified materials, and respect for the people who choose us.
Our dies are made in Italy, with traceable materials, full documentation, and thoughtful design aimed at delivering a safe, durable, and satisfying pasta-making experience, for all levels of users.
Pastidea, we would like to inform our customers that we do not produce or sell pasta dies for the Philips Pasta Maker 7000 or Avance, or for any other pasta machine, with shapes inspired by licensed characters or registered trademarks, such as: Disney, Marvel (e.g. Spider-Man, Iron Man), DC Comics (e.g. Batman, Superman), Star Wars, Peppa Pig, Paw Patrol, Hello Kitty, Frozen, Minions, Super Mario, Pokémon, Barbie, SpongeBob, and similar.
These characters and logos are protected by intellectual property rights and copyright laws, and their reproduction or imitation is strictly prohibited without proper authorization—even in handcrafted form or for seemingly personal use—if intended for sale or public distribution.
Violating these rights can result in serious legal consequences, both civil and criminal. Penalties may include:
Pastidea operates in full compliance with the law and intellectual property rights. For this reason, we only produce pasta dies with original or generic designs, suitable for creative and fun cooking, without infringing on the rights of third parties.
We thank all our customers for their understanding and for continuing to choose Pastidea’s artisan quality, legality, and responsibility.
Copyright is a set of legal rights that protect creative works, such as text, illustrations, images, characters, films, logos, music, and other artistic content. When a work is protected by copyright, only the rights holder (the author or company) can authorize its reproduction, distribution, or modification. In Italy, copyright is protected under the following law:
Characters such as Disney, Marvel, Star Wars, Peppa Pig, etc., are often registered trademarks and are protected by copyright and commercial exploitation rights. This means that no one can reproduce them, even partially or with modifications, without a license or written authorization.
Even seemingly “creative” or “artisanal” uses—such as creating a pasta die that replicates the shape of a character—are considered copyright infringements if intended for sale or public promotion.


